Secure networked applications


The exercises in this experiment will focus on the confidentiality of network services - to what extent is your data protected from unauthorized eavesdroppers on network traffic, when you use services that offer remote login, file transfer, or web access?
You can run this experiment on Cloudlab, FABRIC, or Chameleon! Refer to the testbed-specific prerequisites listed below.
Cloudlab-specific instructions: Prerequisites
To reproduce this experiment on Cloudlab, you will need an account on Cloudlab, you will need to have joined a project, and you will need to have set up SSH access.
FABRIC-specific instructions: Prerequisites
To run this experiment on FABRIC, you should have a FABRIC account and be part of a FABRIC project.
Chameleon-specific instructions: Prerequisites
To run this experiment on Chameleon, you should have a Chameleon account with keys configured on KVM@TACC, and be part of a Chameleon project.
Skip to Run my experiment
Background
Networked applications that offer confidentiality use encryption techniques to protect sensitive data from unauthorized access or modification while the data traverses a network. Some examples of secure applications include HTTPS (web browsing), SSH (remote login), and SCP (file transfer). In contrast, the non-confidential versions of these applications - HTTP, telnet, and FTP - allow eavesdroppers on a network to see potentially sensitive application data.
Run my experiment
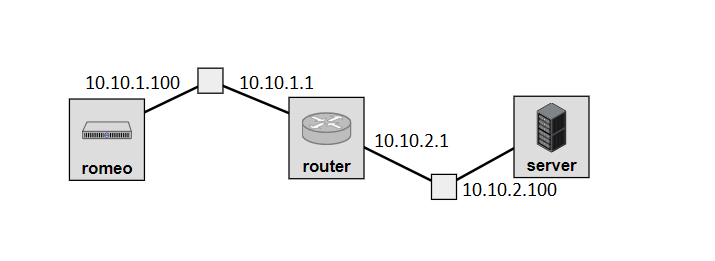
For this experiment, we will use the topology illustrated here, with IP addresses as noted on the diagram and a subnet mask of 255.255.255.0 on each interface:
Follow the instructions for the testbed you are using (GENI, CloudLab, FABRIC, or Chameleon) to reserve the resources and log in to each of the hosts in this experiment.
Cloudlab-specific instructions: Reserve resources
To reserve these resources on Cloudlab, open this profile page:
Click "next", then select the Cloudlab project that you are part of and a Cloudlab cluster with available resources. (This experiment is compatible with any of the Cloudlab clusters.) Then click "next", and "finish".
Wait until all of the resources have turned green and have a small check mark in the top right corner of the "topology view" tab, indicating that they are fully configured and ready to log in. Then, click on "list view" to get SSH login details for the hosts and router. Use these details to SSH into each.
When you have logged in to each node, continue to the Remote Login section.
FABRIC-specific instructions: Reserve resources
To run this experiment on FABRIC, open the JupyterHub environment on FABRIC, open a shell, and run
git clone https://github.com/teaching-on-testbeds/fabric-education secure_applications
cd secure_applications
git checkout secure_applications
Then, open the notebook titled "start_here.ipynb".
Follow along inside the notebook to reserve resources and get the login details for each host and router in the experiment.
When you have logged in to each node, continue to the Remote Login section.
Chameleon-specific instructions: Reserve resources
To run this experiment on FABRIC, open the JupyterHub environment on Chameleon, open a shell, and run
cd work
git clone https://github.com/teaching-on-testbeds/chameleon-education secure_applications
cd secure_applications
git checkout secure_applications
Then, open the notebook titled "start_here.ipynb".
Follow along inside the notebook to reserve resources and get the login details for each host and router in the experiment.
When you have logged in to each node, continue to the Remote Login section.
Remote login
In this exercise, we will compare telnet and SSH, two applications used for remote login to a host.
First, we will need to install and configure these services on the "server" node.
On "server", install the telnet service with
sudo apt update
sudo apt -y install xinetd telnetd
Then create the telnet configuration file with
sudo nano /etc/xinetd.d/telnetPaste the following into the file:
# default: on
# description: telnet server
service telnet
{
disable = no
flags = REUSE
socket_type = stream
wait = no
user = root
only_from = 10.0.0.0/8
server = /usr/sbin/in.telnetd
log_on_failure += USERID
}
Hit Ctrl+O and Enter to save the file, and Ctrl+X to exit nano. Finally, restart the telnet service on "server" with
sudo service xinetd restartYou can check the service status with
service xinetd statusit should be "active (running)".
Next, we will start an SSH server process on the "server" host. Hosts on the testbed already have SSH servers on them, but these are configured to allow remote access to testbed users and administrators. We will start a second, parallel SSH server process on "server", that will run on port 1000 on the experiment interface. ("Our" SSH server runs on a non-default port because the default port, 22, may already be in use by the existing SSH server):
sudo /usr/sbin/sshd -o ListenAddress=10.10.2.100 -o PasswordAuthentication=yes -f /usr/share/openssh/sshd_config -p 1000
Finally, we need to set up a user account for remote access to the "server" host. On the "server", create a new user account with the username "shakespeare":
sudo useradd -m shakespeare -s /bin/shThen run
sudo passwd shakespeareYou will use your own user ID as the password - enter your user ID when prompted for a password, then hit "Enter". (No characters will appear as you type.)
Now we are ready to compare the two remote access applications, with respect to security.
On the "romeo" host, run
sudo tcpdump -i $(ip route get 10.10.2.100 | grep -oP "(?<=dev )[^ ]+") -w security-telnet-$(hostname -s).pcap
to capture traffic on the network segment. This packet capture will show you what is visible to anyone eavesdropping on the network segment.
While this is running, initiate a telnet connection from "romeo" to "server" - on "romeo", run
telnet serverWhen prompted for a "login", enter
shakespeareand hit "Enter". Then, when prompted for a password, enter the password you set previously for the "shakespeare" user.
After you have successfully logged in using telnet, type
dateand hit "Enter", and then type
exitin the telnet session and hit "Enter" to end it. Stop the tcpdump with Ctrl+C.
Next, on the "romeo" host, run
sudo tcpdump -i $(ip route get 10.10.2.100 | grep -oP "(?<=dev )[^ ]+") -w security-ssh-$(hostname -s).pcap
to capture traffic on the network segment. This packet capture will show you what is visible to anyone eavesdropping on the network segment.
While this is running, initiate an SSH connection from "romeo" to "server" on port 1000 - on "romeo", run
ssh shakespeare@server -p 1000Type yes when prompted to confirm the connection. Then, when prompted for a password, enter the password you set previously for the "shakespeare" user.
After you have successfully logged in using SSH, type
dateand hit "Enter", and then type
exitin the SSH session and hit "Enter" to end it. Stop the tcpdump with Ctrl+C.
Transfer both packet captures to your laptop with scp, and analyze with Wireshark. Examine the individual packet payloads, and also use the Analyze > Follow > TCP Stream tool (while one of the packets in the TCP stream is selected).
FABRIC-specific instructions: Transfer files
If you are running this experiment on FABRIC, you can use the "Exercise: Transfer .pcap files from a FABRIC host" section of the "setup.ipynb" notebook to transfer the .pcap files from the host to the Jupyter environment, then download them on your laptop.
Chameleon instructions: Transfer files
If you are running this experiment on Chameleon, you can use the "Exercise: Transfer .pcap files from the remote hosts" section of the "start_here.ipynb" notebook to transfer the .pcap files from the host to the Jupyter environment, then download them on your laptop.
File transfer
In this exercise, we will compare FTP and SFTP, two applications used for file transfer to and from a remote host. SFTP tunnels FTP traffic over an SSH session.
First, you'll need to install the SFTP server on the "server" node:
sudo apt -y install vsftpdYou should have already prepared a user account named "shakespeare" on the server node, in the previous exercise. We will use this account again.
On the "romeo" host, run
sudo tcpdump -i $(ip route get 10.10.2.100 | grep -oP "(?<=dev )[^ ]+") -w security-ftp-$(hostname -s).pcap
to capture traffic on the network segment. This packet capture will show you what is visible to anyone eavesdropping on the network segment.
While this is running, initiate an FTP session from "romeo" to "server" - on "romeo", run
ftp serverWhen prompted for a "Name", enter
shakespeareand hit "Enter". Then, when prompted for a password, enter the password you set previously for the "shakespeare" user.
After you have successfully authenticated your FTP session (you will see the message "230 Login successful"), you will see an FTP prompt. At the FTP prompt, type
cd /etcand then
get passwdThis will transfer a list of all usernames on the remote system over the FTP session. Finally, type
exitin the FTP session and hit "Enter" to end it. Stop the tcpdump running with Ctrl+C.
You can run
cat passwdon "romeo" to view the file that you transferred.
Next, on the "romeo" host, run
sudo tcpdump -i $(ip route get 10.10.2.100 | grep -oP "(?<=dev )[^ ]+") -w security-sftp-$(hostname -s).pcap
to capture traffic on the network segment. This packet capture will show you what is visible to anyone eavesdropping on the network segment.
While this is running, initiate an SFTP connection from "romeo" to "server" on port 1000 - on "romeo", run
sftp -P 1000 shakespeare@serverWhen prompted for a password, enter the password you set previously for the "shakespeare" user.
At the SFTP prompt, type
cd /etcand then
get passwdto retrieve the same file. Then, type
exitin the SFTP session and hit "Enter" to end it. Stop the tcpdump running with Ctrl+C.
Transfer both packet captures to your laptop with scp, and analyze with Wireshark. Examine the individual packet payloads, and also use the Analyze > Follow > TCP Stream tool (while one of the packets in the TCP stream is selected). (Note that FTP uses multiple TCP connections - one for control and one for file data. Use the TCP Stream tool to look at both, the control stream and the file data stream.)
FABRIC-specific instructions: Transfer files
If you are running this experiment on FABRIC, you can use the "Exercise: Transfer .pcap files from a FABRIC host" section of the "setup.ipynb" notebook to transfer the .pcap files from the host to the Jupyter environment, then download them on your laptop.
Chameleon instructions: Transfer files
If you are running this experiment on Chameleon, you can use the "Exercise: Transfer .pcap files from the remote hosts" section of the "start_here.ipynb" notebook to transfer the .pcap files from the host to the Jupyter environment, then download them on your laptop.
Web access
In this exercise, we'll compare HTTP and HTTPS (HTTP over SSL/TLS).
To setup this part of the experiment, on the "romeo" node, install lynx package to browse the web from the terminal host session:
sudo apt update
sudo apt -y install lynx
On the "server" node, install the Apache web server:
sudo apt -y install apache2Then, generate a self-signed certificate and key for it, which will be used to authenticate the server and to establish an encrypted connection to the server:
sudo openssl req -x509 -nodes -days 365 -newkey rsa:2048 -keyout /etc/ssl/private/ssl-cert-snakeoil.key -out /etc/ssl/certs/ssl-cert-snakeoil.pem
and answer the questions when prompted. You can invent a fictional "Organization Name" and "Organizational Unit Name" for your server. For the "Common Name" question, use the name "server".
For example:
Country Name (2 letter code) [AU]:US
State or Province Name (full name) [Some-State]:New York
Locality Name (eg, city) []:Brooklyn
Organization Name (eg, company) [Internet Widgits Pty Ltd]:NYU Tandon School of Engineering
Organizational Unit Name (eg, section) []:Department of Electrical and Computer Engineering
Common Name (e.g. server FQDN or YOUR name) []:server
Email Address []:ffund@nyu.edu
Now that we have the website certificate and key, we'll update the Apache configuration to use them.
Edit the config file for the SSL-enabled version of the site:
sudo nano /etc/apache2/sites-available/default-ssl.confAfter the <VirtualHost _default_:443> line, add a ServerName line with the hostname of the "server" host. Excluding comments, the config file will end up looking similar to the following:
<IfModule mod_ssl.c>
        <VirtualHost _default_:443>
                ServerName server
                ServerAdmin webmaster@localhost

                DocumentRoot /var/www/html

                SSLEngine on
                SSLCertificateFile      /etc/ssl/certs/ssl-cert-snakeoil.pem
                SSLCertificateKeyFile /etc/ssl/private/ssl-cert-snakeoil.key
        </VirtualHost>
</IfModule>
(although there may be some additional lines not shown here.)
Enable the SSL module for Apache and the new SSL-enabled site, and restart the service:
sudo a2enmod ssl
sudo a2ensite default-ssl.conf
sudo systemctl restart apache2
Finally, create a form for data entry on your new site. Open a new HTML file with
sudo nano /var/www/html/form.htmland place the following HTML inside this file:
<!DOCTYPE html>
<html>
  <body>
    <form action="/done.html">
      <label for="fname">First name:</label><br>
      <input type="text" id="fname" name="fname" value="John"><br>
      <label for="lname">Last name:</label><br>
      <input type="text" id="lname" name="lname" value="Doe"><br><br>
      <input type="submit" value="Submit">
    </form>
  </body>
</html>
Save with Ctrl+O, then use Ctrl+X to quit nano.
Open a new HTML file with
sudo nano /var/www/html/done.htmland place the following HTML inside this file:
<!DOCTYPE html>
<html>
  <body>
    <h1>Done!</h1>
  </body>
</html>
Save with Ctrl+O, then use Ctrl+X to quit nano.
Now that everything is prepared on the server. We'll compare HTTP vs. HTTPS access to this web form.
On the "romeo" host, run
sudo tcpdump -i $(ip route get 10.10.2.100 | grep -oP "(?<=dev )[^ ]+") -w security-http-$(hostname -s).pcap
to capture traffic on the network segment. This packet capture will show you what is visible to anyone eavesdropping on the network segment.
While this is running, initiate an HTTP session from "romeo" to "server" - on "romeo", run
lynx http://server/form.htmlEnter your first name and last name in the form fields (you can use Tab or Enter to navigate to the next field), then navigate to the Submit button control and hit Enter to submit your form. You should see a "Done!" message. Then, type q to quit and y to confirm your choice.
Stop the tcpdump with Ctrl+C.
Next, on the "romeo" host, run
sudo tcpdump -i $(ip route get 10.10.2.100 | grep -oP "(?<=dev )[^ ]+") -w security-https-$(hostname -s).pcap
to capture traffic on the network segment. This packet capture will show you what is visible to anyone eavesdropping on the network segment.
While this is running, initiate an HTTPS connection from "romeo" to "server" - on "romeo", run
lynx https://server/form.htmlYou'll be warned that you are trying to access a site with a certificate that is not trusted, since our site has a self-signed certificate. Type y to continue. You may also be warned that the name of the server doesn't match the certificate name. Type y to continue anyway. Finally, you'll see the same form.
Fill in the form fields (you can use Tab or Enter to navigate to the next field), then navigate to the Submit button control and hit Enter to submit your form.
Before you get to the "Done!" message, you'll have to confirm again that you want to accept the self-signed certificate (y) and you may need to confirm again that you want to continue even though the server name doesn't match (y).
Once you see a "Done!" message, type q to quit and y to confirm your choice.
Stop the tcpdump with Ctrl+C.
Use scp to transfer all of the packet captures to your laptop, then open them in Wireshark for analysis.
FABRIC-specific instructions: Transfer files
If you are running this experiment on FABRIC, you can use the "Exercise: Transfer .pcap files from a FABRIC host" section of the "setup.ipynb" notebook to transfer the .pcap files from the host to the Jupyter environment, then download them on your laptop.
Chameleon instructions: Transfer files
If you are running this experiment on Chameleon, you can use the "Exercise: Transfer .pcap files from the remote hosts" section of the "start_here.ipynb" notebook to transfer the .pcap files from the host to the Jupyter environment, then download them on your laptop.
Notes
Exercise
Answer the following questions about your experiment results:
- In the packet capture of the
telnetexperiment, can you read: the username and password? IP/TCP headers? Session data? Show evidence. - In the packet capture of the SSH experiment, can you read: the username and password? IP/TCP headers? Session data? Show evidence.
- In the packet capture of the FTP experiment, can you read: the username and password? IP/TCP headers? The name of the file transferred, and the file contents? Show evidence.
- In the packet capture of the SFTP experiment, can you read: the username and password? IP/TCP headers? The name of the file transferred, and the file contents? Show evidence.
- In the packet capture of the HTTP experiment, can you read: the IP and TCP headers? The contents of the HTTP GET (including the name of the page you visited,
form.html)? The data you entered in the form? Show evidence. - In the packet capture of the HTTPS experiment, can you read: the IP and TCP headers? The contents of the HTTP GET (including the name of the page you visited,
form.html)? The data you entered in the form? Show evidence.
Credit
With contributions from Mayuri Upadhyaya.