Passive sniffing in 802.11 networks

In this experiment, we will observe the level of confidentiality provided by three kinds of WiFi networks - an open WiFi network, a WEP network, and a WPA network.
You will have to download and install Wireshark to run this experiment. You should do this before your reservation on the wireless testbed.
It should take about 120 minutes to run this experiment, but you will need to have reserved that time in advance. This experiment uses wireless resources, and you can only use wireless resources on ORBIT/COSMOS during a reservation.
To reproduce this experiment on ORBIT/COSMOS, you will need an account, and you will need to have joined a project. You should have already uploaded your SSH keys to your profile. Finally, you must have reserved time on the "outdoor" testbed at ORBIT, and you must run this experiment during your reserved time. (Alternatively, you can use "sb4" testbed at ORBIT, with some modifications to the instructions.)
Results
We observe that with an open WiFi network, a passive sniffer can read any traffic sent over the network:

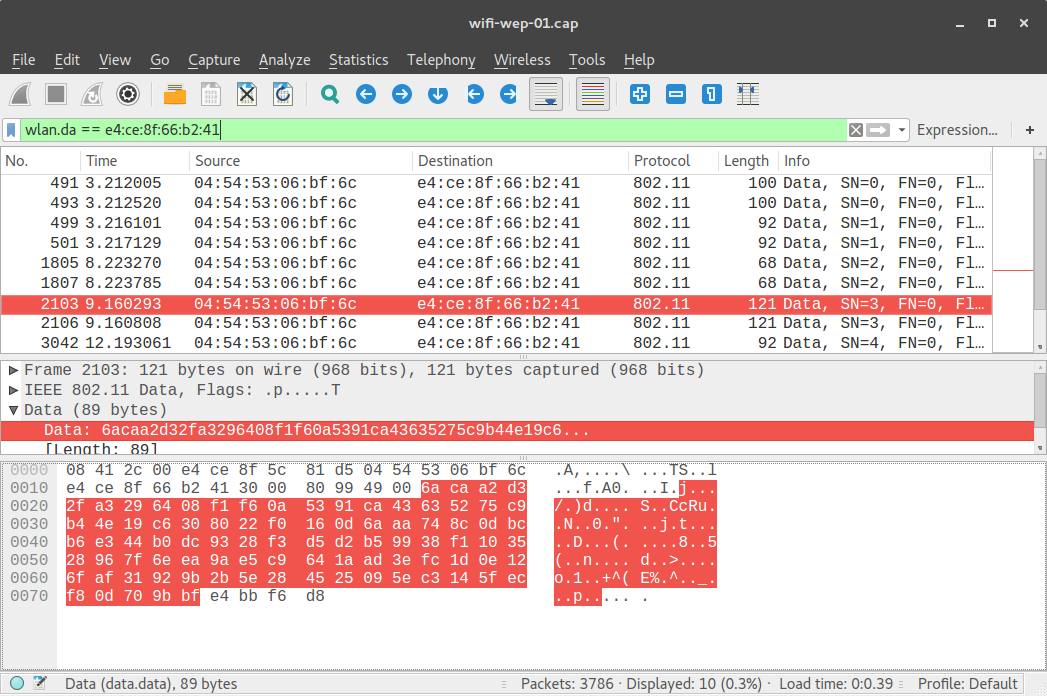
In a WiFi network protected by WEP, the data is encrypted:
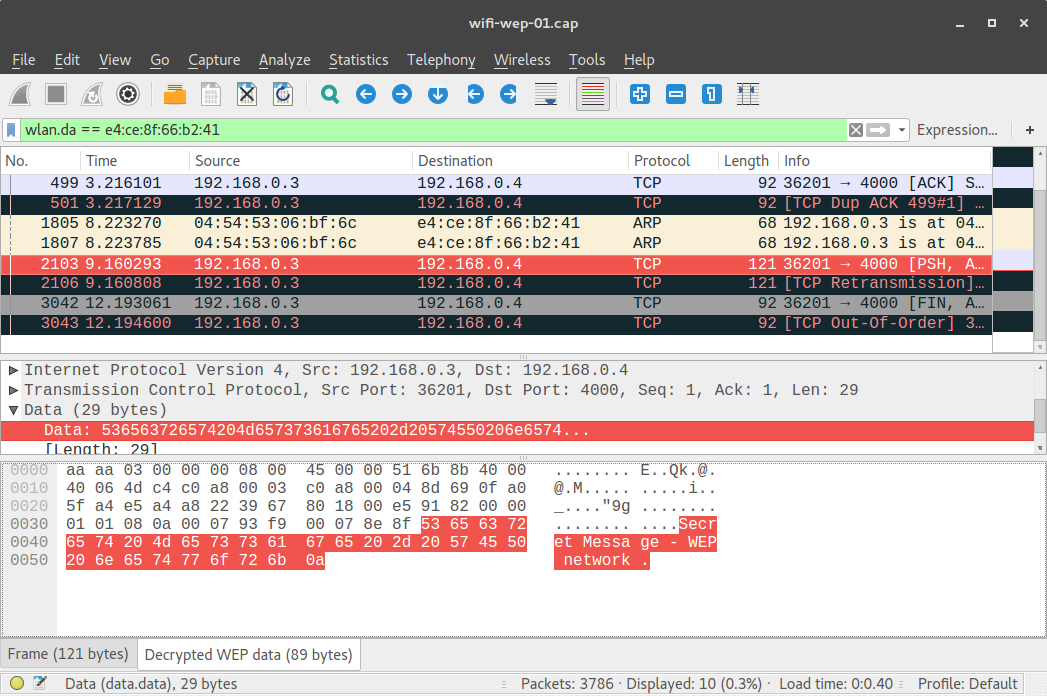
but if the attacker finds out the WEP key, she can decrypt it:

(note that the same frame, no. 2103, is highlighted in the two screenshots above.)
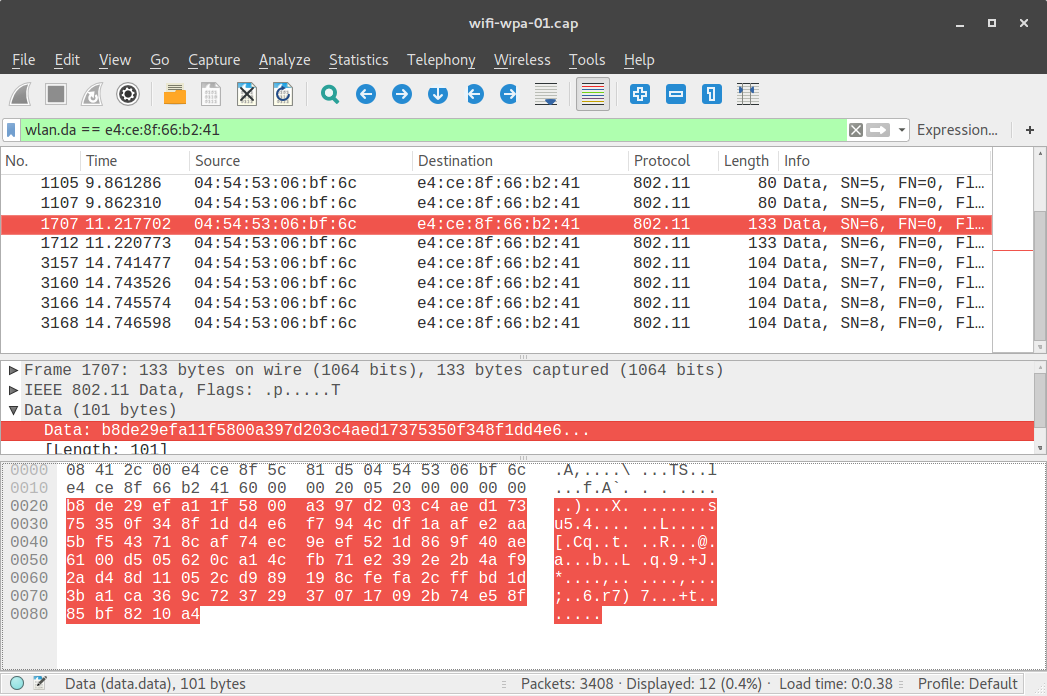
In a WiFi network protected by WPA, the data is encrypted, and even with the WPA key the attacker cannot decrypt it:
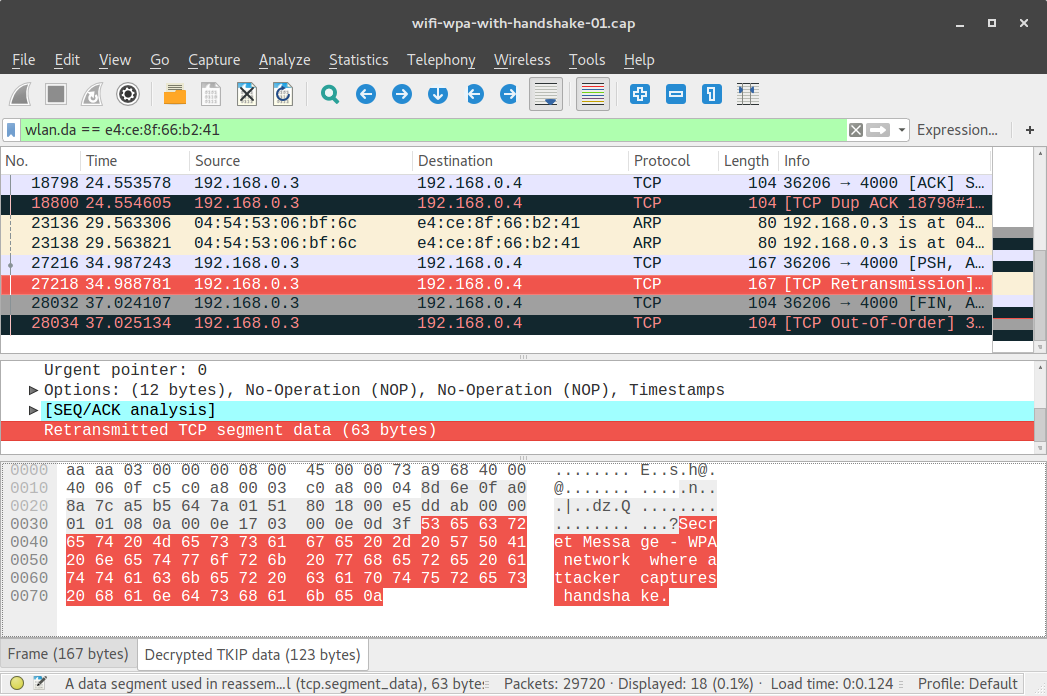
However, if the attacker has captured the 4-way handshakes between AP and client when the client associates AND knows the WPA key, then the attacker can decrypt user traffic:
Run my experiment
To run this experiment, you must have a current reservation on the "outdoor" testbed at ORBIT. You can also use the "sb4" testbed at ORBIT, with some modifications to the instructions.
At your reserved time, SSH to your testbed console (e.g. "outdoor.orbit-lab.org" for outdoor on ORBIT, "sb4.orbit-lab.org" for sb4 on ORBIT) using your ORBIT/COSMOS username and SSH keys.
For this experiment, we will need a group of four neighboring nodes that are available and have an Atheros 9xxx wireless card. In the instructions that follow, we use node1-2, node1-3, node1-4, and node1-5 on the ORBIT outdoor testbed. If any of these are not available, you can substitute other Atheros 9xxx-equipped nodes that are available.
To find out which nodes are available:
- Log in to your account at https://orbit-lab.org/
- Click on the "Status" tab in the menu on the left side
- Click on the "outdoor" tab
- On the left side, find the "WiFi" menu option and expand it
- Check the box that says "Ath9k"
- Then, look for nodes that are
- marked with an X in the visualization - these have an Atheros 9xxx card.
- either blue or green in the visualization - this means they are available and expected to be responsive. (Red nodes are not responsive.)
- for this particular experiment, you need four such nodes that are close by to one another.
Prepare the testbed
If you are using sb4: Follow the modified instructions to set up the testbed. Then, resume with the regular instructions from Open SSH sessions.
Next, load the wifi-experiment.ndz disk image onto all the nodes in your group. For example, if you are on outdoor and using node1-2, node1-3, node1-4, and node1-5, run:
omf-5.4 load -i wifi-experiment.ndz -t node1-2.outdoor.orbit-lab.org,node1-3.outdoor.orbit-lab.org,node1-4.outdoor.orbit-lab.org,node1-5.outdoor.orbit-lab.orgWhen the image has been loaded onto the nodes, turn them on. For example, if using the four nodes on outdoor, you would run
omf tell -a on -t node1-2.outdoor.orbit-lab.org,node1-3.outdoor.orbit-lab.org,node1-4.outdoor.orbit-lab.org,node1-5.outdoor.orbit-lab.orgOpen SSH sessions
Wait a few minutes for your nodes to boot. Then, open six terminal windows and SSH to your testbed console ("outdoor.orbit-lab.org", or "sb4.orbit-lab.org") in each one.
Of the four nodes in your group, designate one node as the access point (AP), one node as Alice, one node as Bob, and one node as Mallory. In this experiment, Mallory will attempt to passively sniff communications between Alice and Bob.
Important note: if you are using the outdoor testbed on ORBIT, due to the physical layout of nodes it is recommended to use node1-4 as the AP. In other configurations (using a different node as the AP), the other nodes may not all be in range of the AP.
- In one of your SSH terminals, SSH to the node that you have designated as the AP, as the "root" user. (For example:
ssh root@node1-4) - In one of your SSH terminals, SSH to the node that you have designated as Bob, as the "root" user.
- In one of your SSH terminals, SSH to the node that you have designated as Alice, as the "root" user.
- In the fourth of your SSH terminals, SSH to the node that you have designated as Mallory, as the "root" user.
Run an open WiFi network
On the node designated as the AP, create a file hostapd-open.conf with the following contents:
interface=wlan0
driver=nl80211
ssid=wifi-open
hw_mode=g
channel=6
Then, run
hostapd hostapd-open.conf
to start the wireless AP.
On the two nodes designated as Alice and Bob, run
ifconfig wlan0 up
iwconfig wlan0 mode managed
iwconfig wlan0 essid "wifi-open"
to connect to the network. You should see a line of output on the AP node like
AP-STA-CONNECTED 04:54:53:06:bf:6c
(with the client's MAC address) each time a client connects. Make sure both Alice and Bob have connected; run
iwconfig wlan0
on each, and look for the indication that they are connected to the ESSID "wifi-open".
Also assign an IP address on each client node - on Alice, run
ifconfig wlan0 192.168.0.3
and on Bob, run
ifconfig wlan0 192.168.0.4
On Mallory, put the wireless interface into monitor mode:
airmon-ng start wlan0
Then run
airodump-ng mon0 --bssid E4:CE:8F:5C:81:D5 --channel 6 -w wifi-open -o pcap
where you replace the part in bold with the MAC address of the AP. (Use iwconfig wlan0 on either Alice or Bob to find out the AP's MAC address.)
Now we will pass some user data between Alice and Bob. On Bob, run
netcat -l 4000
and leave that running. On Alice, run
netcat 192.168.0.4 4000
to connect to Bob. Then, type a message into the terminal window on either Alice or Bob and hit Enter. You should see your message appear in the terminal of the other host.
Use Ctrl+C to stop the running processes on all four hosts. On the Mallory node, you should have a file named wifi-open-01.cap (or possibly with a different number, if you've run the airodump-ng more than once). Use scp or transfer.sh to transfer this file to your own computer, and open it with Wireshark.
Note: To retrieve a file from a node on a wireless testbed like ORBIT, you need to use scp in two steps:- First, log in to the testbed console (
outdoor.orbit-lab.org, or equivalent) and transfer the file from the testbed node to your home directory on the testbed console. For example:
ffund@outdoor.orbit-lab.org:~$ scp root@node1-1:/root/wifi-open-01.cap wifi-open-01.cap- Then, from a BASH shell on your own device (e.g. laptop), transfer the file from the testbed console to your device. For example:
ffund@ffund-laptop:~$ scp ffund@outdoor.orbit-lab.org:~/wifi-open-01.cap wifi-open-01.capLook for the data packets containing the secret message - is the attacker, who is not connected to the network, able to see the data in plaintext? (Use the Wireshark filter bar to filter on Alice's and Bob's MAC addresses, to more easily find the relevant packets.)
Run a WEP network
Next, we will repeat the experiment with a WEP network.
On the AP node, create a file hostapd-wep.conf with the following contents:
interface=wlan0
driver=nl80211
ssid=wifi-wep
hw_mode=g channel=6
auth_algs=2
wep_default_key=0
wep_key0="12345"
then run
hostapd hostapd-wep.conf
And on the two clients (Alice and Bob), run
ifconfig wlan0 up
iwconfig wlan0 mode managed
iwconfig wlan0 essid "wifi-wep"
iwconfig wlan0 key s:12345
iwconfig wlan0 ap E4:CE:8F:5C:81:D5
to connect to the network, where in place of the BSSID in bold, you use the AP's BSSID. Watch the terminal output on the AP and make sure you see the "AP-STA-CONNECTED" message for each client, then use ifconfig again to assign the IP address 192.168.0.3 to Alice and 192.168.0.4 to Bob.
On Mallory, the wireless interface should still be in monitor mode from the previous experiment. So we need only run
airodump-ng mon0 --bssid E4:CE:8F:5C:81:D5 --channel 6 -w wifi-wep -o pcap
(again, substituting the BS MAC address).
Now we will pass some user data between Alice and Bob. On Bob, run
netcat -l 4000
and leave that running. On Alice, run
netcat 192.168.0.4 4000
to connect to Bob. Then, type a message into the terminal window on either Alice or Bob and hit Enter. You should see your message appear in the terminal of the other host.
Use Ctrl+C to stop the running processes on all four hosts.
From the Mallory node, transfer the file wifi-wep-01.cap to your own computer, and open it with Wireshark. Look for the data packets containing the secret message - is the attacker able to see the data in plaintext when the attacker does not know the WEP key? (Use the Wireshark filter bar to filter on Alice's and Bob's MAC addresses, to more easily find the relevant packets.)
If the attacker later finds out the WEP key, will she be able to decrypt the traffic?
In Wireshark, add the key for the WEP network and see if it is able to decrypt the packets. The following instructions are for Wireshark version 2.2.6, but should work with minor modifications for other versions of Wireshark:
- Open the "Preference" menu with "Edit > Preferences", then in the "Protocols" section choose "IEEE 802.11".
- Click on the "Edit" button next to "Decryption Keys".
- Then click on the "+" to add a key.
- Set the type of key to WEP, and then enter the WEP key in hex format -
31:32:33:34:35- so that it looks something like this:
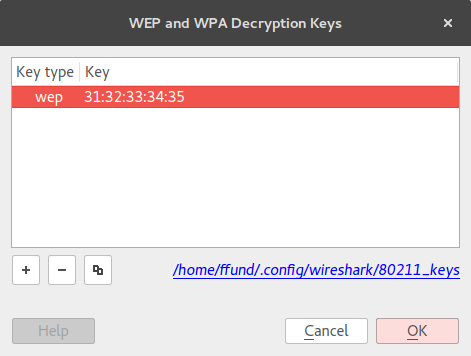
Hit OK, and close Wireshark. Then open the packet capture again, and find the relevant packets. Look for a "Decrypted WEP data" tab on the bottom, and see if the attacker is able to read the message sent between Alice and Bob.
Run a WPA network
Finally, we will try the experiment again for a WPA network.
On the AP node, create a file hostapd-wpa.conf with the following contents:
interface=wlan0
driver=nl80211
ssid=wifi-wpa
hw_mode=g
channel=6
auth_algs=1
wpa=1
wpa_key_mgmt=WPA-PSK
wpa_passphrase=123456789
then run
hostapd hostapd-wpa.conf
to start the AP.
In a WPA network using a pre-shared key, a binary key is derived from a combination of the SSID and the passphrase, using the PBKDF2 key derivation function. The wpa_passphrase tool is used to generate a config file which includes the SSID and this binary key. To use it, on each of Alice and Bob, run
wpa_passphrase wifi-wpa 123456789 > wpa.conf
You can inspect the contents of this configuration file with
cat wpa.conf
and notice the binary key:
network={
  ssid="wifi-wpa"
  #psk="123456789"
  psk=ebe5f11342aedef8edcf53317352a6ac89699c9a0a5cc5c823101012590de6bb
}
Then, to connect to the network on each of Alice and Bob, run
ifconfig wlan0 up
wpa_supplicant -iwlan0 -cwpa.conf -B
Watch the terminal output on the AP and make sure you see the "AP-STA-CONNECTED" message for each client, then use ifconfig once more to assign the IP addresses 192.168.0.3 and 192.168.0.4 to Alice and Bob, respectively.
Note: the WPA supplicant utility will remain running as a background process, and will attempt to reconnect if the client is disconnected from the network. Be careful not to run it more than once - if you have two supplicants running at the same time, they will conflict and cause connectivity issues.
On Mallory, the wireless interface should still be in monitor mode from the open network experiment. So we need only run
airodump-ng mon0 --bssid E4:CE:8F:5C:81:D5 --channel 6 -w wifi-wpa -o pcap
(again, substituting the BS MAC address).
Now we will pass some user data between Alice and Bob. On Bob, run
netcat -l 4000
and leave that running. On Alice, run
netcat 192.168.0.4 4000
to connect to Bob. Then, type a message into the terminal window on either Alice or Bob and hit Enter. You should see your message appear in the terminal of the other host.
Use Ctrl+C to stop the running processes on all four hosts.
From the Mallory node, transfer the file wifi-wpa-01.cap to your own computer, and open them with Wireshark. Look for the data packets containing the secret message - is the attacker able to see the data in plaintext?
Let us add the WPA key to Wireshark, to see if the attacker will be able to decrypt the traffic given the key. Open the "Decryption Keys" menu, and add a key with type "wpa-psk" and the value
ebe5f11342aedef8edcf53317352a6ac89699c9a0a5cc5c823101012590de6bb
(this is the key derived from the combination of SSID and passphrase). It should look like this:
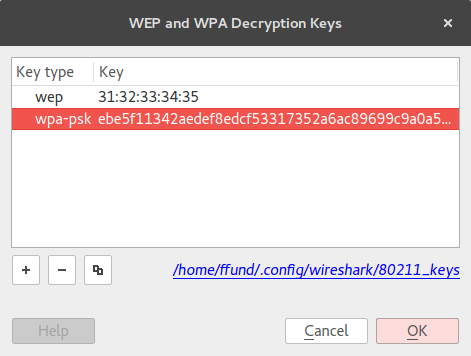
Press "OK" and re-open the WAP packet capture. Is Mallory able to read the message in plaintext?
In the WPA network, an attacker needs to have captured the client's 4-way handshake in order to read data sent by the client over the network. Let's try again, in a scenario where Mallory is able to start capturing before Alice and Bob join the network.
On Alice and Bob, run
killall wpa_supplicant
to stop the WPA supplicant process.
On Mallory, start capturing traffic with
airodump-ng mon0 --bssid E4:CE:8F:5C:81:D5 --channel 6 -w wifi-wpa-with-handshake -o pcap
(substituting the BS MAC address).
Then, on the AP, run
hostapd hostapd-wpa.conf
again. Then on Alice and Bob, run
wpa_supplicant -iwlan0 -cwpa.conf -B
Watch for the "AP-STA-CONNECTED" message to appear with Alice's and Bob's MAC addresses in the AP terminal output. Run netcat again on Alice and Bob and send a message between from one to the other. Then, use Ctrl+C to stop the running processes on all four hosts.
From the Mallory node, transfer the file wifi-wpa-with-handshake-01.cap to your own computer, and open it with Wireshark. First, use the "eapol" Wireshark filter and make sure that the 4-way handshakes between the AP and Alice and between the AC and Bob are captured:
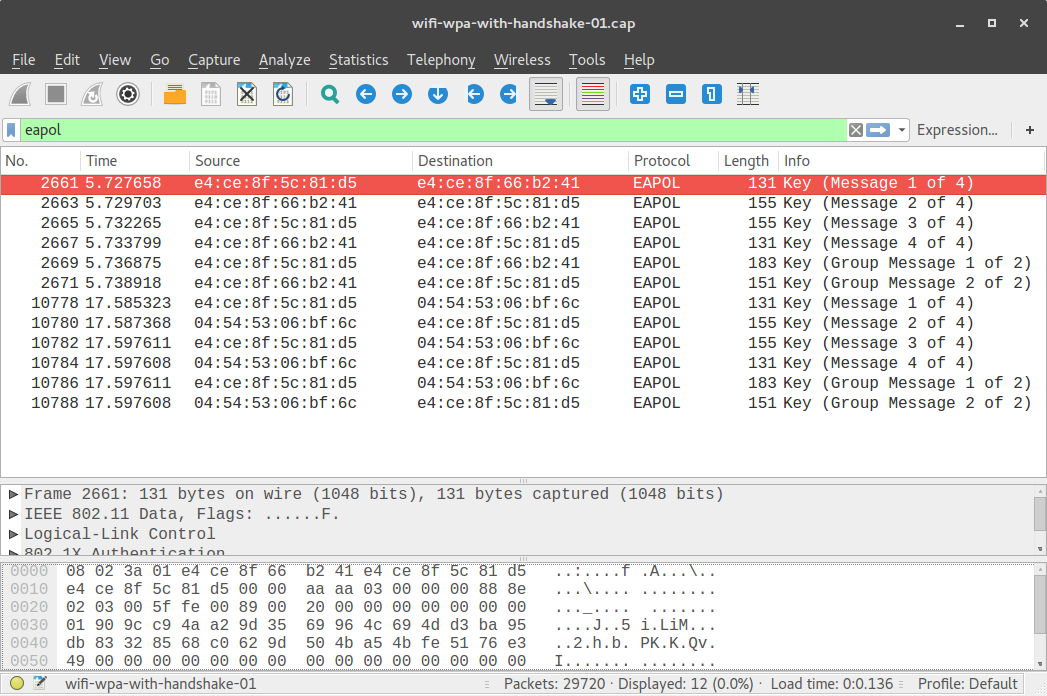
Then, look for the data packets containing the secret message, and specifically look for a "Decrypted TKIP data" tab on the bottom - is Mallory able to read the data if she has captured the 4-way handshakes?
Notes
Exercise
Show the results of your own experiment, similar to what is shown in the Results section on this page.
Answer the following questions:
- Why is knowledge of the key alone sufficient to decrypt traffic in a WEP network, but not in a WPA network? Explain the differences between the encryption keys used in WEP and WPA.
- Why does capturing the 4-way handshake help the attacker with knowledge of the WPA key decrypt the WPA traffic? What information from the 4-way handshake does the attacker need, and how is that information used?
Using other wireless testbeds
This experiment will also work on the "sb4" testbed at ORBIT, which currently has four Atheros 9xxx-equipped nodes: node1-3, node1-4, node1-5, and node1-6. If using "sb4", when you first log in to the "sb4" console you should run
wget -qO- "http://internal2dmz.orbit-lab.org:5054/instr/setAll?att=0"
wget -qO- "http://internal2dmz.orbit-lab.org:5054/instr/selDevice?switch=3&port=1"
wget -qO- "http://internal2dmz.orbit-lab.org:5054/instr/selDevice?switch=4&port=1"
wget -qO- "http://internal2dmz.orbit-lab.org:5054/instr/selDevice?switch=5&port=1"
wget -qO- "http://internal2dmz.orbit-lab.org:5054/instr/selDevice?switch=6&port=1"
to reset sb4's programmable attenuation matrix to zero attenuation between all pairs of nodes.
Then you can run
omf-5.4 load -i wifi-experiment.ndz -t node1-3.sb4.orbit-lab.org,node1-4.sb4.orbit-lab.org,node1-5.sb4.orbit-lab.org,node1-6.sb4.orbit-lab.organd when the disk image has finished loading, run
omf tell -a on -t node1-3.sb4.orbit-lab.org,node1-4.sb4.orbit-lab.org,node1-5.sb4.orbit-lab.org,node1-6.sb4.orbit-lab.orgThen, resume with the regular instructions from Open SSH sessions.
You can also run this experiment on any group of four adjacent Atheros 9XXX-equipped nodes on the "grid" testbed at ORBIT. The "grid" testbed is generally in high demand, however.